Showing posts with label misc crafts. Show all posts

Friday, June 25, 2010

It's a cinch!

I needed a gift for a little superhero
who is turning 5 this weekend.
I decided to make a cinch bag
mostly using this tutorial from Martha
and some spiderman fabric from my stash.


First, I cut a 14-1/2" x 32" piece of fabric
and folded in the short ends 1/4 inch
and then another inch to make the tubes
for the drawstring:


Sew up your sides, but
stop before you get to the tubes!
You can also sew in short loops of ribbon
at the bottom for later.
(See Martha's tutorial or my picture at the bottom)


Then I cut letters of the superhero's name
out of interfacing
b a c k w a r d s
(remember that part)
(I do it wrong first everytime)
and ironed them onto some
coordinating fabric:


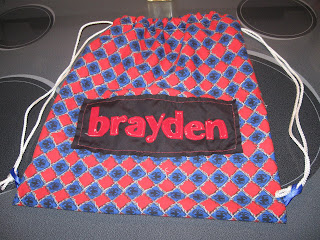
Cut out the letters and
sew them onto some black fabric:

I had red thread in my machine
and white thread in my bobbin...
something was definitely wrong with my tension
but in this instance,
I actually really like the outcome.


Cut two lengths of nylon cord - 50 inches
(heat seal the edges so they don't fray)
and slid them through the tubes at the top:

And knot them through the loops you sewed
into the bottom of the side seams
because you were too cheap
to fork out $22 for a grommet punch!

And there you have it!
A super-fun, personalized gift
for a superhero!

Friday, June 4, 2010

Beaded Serving Spoons

Have you seen these at the craft fairs?


I think they are gorgeous
and I knew I could make them for cheaper
than I could buy them.

I used:
20 gauge wire ($2)
thrifted spoons (50 cents each)
bead collections from Joann's ($2-4 each)

I used the tutorial found here.
They came together so easily!
Two picked out which bead we used
and also strung them on the wire.


(Not only are the beautiful serving pieces,
apparently they are also great
to accessorize that perfect outfit!)


These would make excellent gifts!
If I can bear to part with them,
they might be headed to One's teacher
for Teacher Appreciation!


Thursday, May 6, 2010

Ruffle Baby Hat

I made this little ruffle hat
using GraceViolet's tutorial:


Super cute but needed something more:


How cute it this?!?


It's got that cute boutique look but...
it's bigger than her head!


Bummer, I don't know why I'm so surprised.

I think I'll take the flower off
and put a cute little bow on it instead.

Friday, March 12, 2010

Easter Prep

I made this felt flower to go in
Two's hair for Easter:


It was super easy!
The directions and template are here.


It's going on a headband
but I couldn't wait to show it off.
Here it is with her Easter dress:


Super cute!


Friday, January 22, 2010

Felt Hair Clips

I recently made
Felt Covered Snap Clips
using Angry Chicken's tutorial.

They were super easy
and you really could go crazy
embellishing them.

I tried two versions.

(I found my snap clips at Joann's in the beading accessory/hardware aisle.)

The top one is with my sewing machine
the bottom is just needle and embroidery thread.
I like the top one the best
but to each his own!

Dress 'em up a little bit and
they would make a great birthday gift!
Or I've actually thought about making
one for all the girls in Two's class
for Valentine's Day....
They're that easy.


Thursday, September 10, 2009

Shrinky Dinks

We got crafty with Shrinky Dinks today!
I have an organization idea that needed some personalization.
I'll share that later,
but what a trip down memory lane
to do Shrinky Dinks again!!!

No more smurfs....
these were Make Your Own!


Watching....it seriously took about 60 seconds!
Perfect for kids (and who are we kidding, moms too!)


Look how much they shrank!!!
I don't know why I was so surprised!


Close-up of finished product:


We used Crayola marker. It ended up running A LOT! The green and white stripes are so blurred now. Next time I'll use colored pencils.

This was so fun!


Shrinky Dink 12 Blank Pages at Joann's for $5
(We used 2 pages for ours.)
Oven at 325 degrees for 1-3 min.

Monday, August 31, 2009

Tie-Dye & Youth

I love our youth!
And they love my kids!
My kids love them too!

So at the End-of-Summer Party
they play soccer together,
take them down HUGE homemade slip-n-slides
made even more slippery with dawn dish soap...
(hello, that totally counts as a bath too! :o) )
and help them make tie-dye!


(tie-dye kits that include turquoise and/or fushia will always be bright and vivid!)


Everyone wore their shirts to church yesterday
(We are a fun church!)
and here's what my kiddos sported:


As a tangent:
Any babysitter I've had,
which I admit is not many,
are all from our youth group.
When people ask for babysitter suggestions,
you guessed it,
it's always someone from the youth group!

I've often wondered how people
who don't go to church
find babysitters!

So here is my unsolicited advice:
If you ever need a babysitter, ask
a) high school teacher
b) a church go-er

Saturday, August 8, 2009

Kids Grow

I've always wanted a "growth wall" to mark the kids' height as they grow.
We didn't do it at our old house because we knew we would be there for only a few years. If our current house isn't our last house, we'll certainly be here for awhile, so we found a measuring spot on our wall.

But what if we move? We can't exactly bring the wall with us!

Then I saw a great idea at this blog. (It's one of my favorites. You can hunt for the exact post if you'd like. You'll no doubt find many other inspirations over there too!)

I got a 1"x4"x8' piece of wood from the hardware store.
DaddyMan cut them to 6ft and attached two yard sticks.
I bought HomeDepot yard sticks for 61 cents each.
You could pay $7 at Joann's for one's that didn't have a brand name on them
buuuutttttt, did I mention the one's at Home Depot were 61 cents?


Your wood is wider than the yard sticks
so after you attach the yard sticks
you still have room to mark your childs height
and write the date.


Best of all, you never have to leave them behind if you move!

Thursday, July 30, 2009

Money, Money, Money

I am a big fan of Dave Ramsey.
And who would think a financial planning book
could be such a good read?!

Part of his book details how to teach your kids about money.

Money jars were in order!

Supplies:


Cut your white paper into 2" strips.
Have your workers tear the edges off.


Then go feed your baby and put him to bed.
Have your workers get ready for bed too
but make sure you reassure them
it is not bedtime!

Then"decoration" it, add your money, and take a picture!

Then, the next day, you can explain to them that
'no, they don't get money every day...'

Thursday, July 23, 2009

Plus-Size Flowers

Dollar Store flowers ROCK!

At this post, I used them to make a hair pin for Two.
Then my girls group (10th-11th grade) got together
and we made pins for ourselves.

Here are mine:


My girls got a kick out of how full they were.
I just couldn't stop adding more petals!
Don't knock the plus-size flower!

To make them:
I combined lots of layers of each size
petal to make them super full,
(Seriously, these are like 3-4 flowers combined!)
then topped them with a clearance button from Joann's,
and added a pin to the back.

I wore the pink one on my Anniversary Date with DaddyMan
and got lots of compliments.

Put one on a shirt, put one on your bag....
Go make one!
Seriously, it cost less than $1.50.

Friday, July 3, 2009

99 cent Tommy Hilfiger Dress

I don't think DaddyMan was thrilled when I wanted to take time today to make Two a special 4th of July dress (you know, last minute and all). I'm sure he was envisioning hours and hours but this outfit came together in no time! It's the basic pillowcase dress with a felt flower inspired by flowers Kimba used to have in her shop. Two is all about double french braids lately but didn't want to wear the two red, white, and blue korker hairbows I made last year in her hair. But she was all for putting them on her dress! I just clipped them onto the ribbon at the shoulder and I think they look so cute!


Best of all, since this dress started out as a Tommy Hilfiger pillowcase for only 99 cents....


I'm pretty sure that now makes it Two's 99 cent Tommy Hilfiger DRESS!

:o)

Tuesday, June 2, 2009

Not even close to a tutorial, but CUTE Flower!


Grace Violet is one of my new favorite blogs.
She lives in OKC, the same town I grew up in.
I don't know why you need to know that, but I got really excited over it and it totally makes me feel connected to her.
Anyway, check her out, she's always got something fun going on!


When I saw her flower pins, I knew I had to give them a try.
Here are my flowers from The Dollar Store that I ripped apart and played mix 'n match with the layers until I found combos I liked.


And here's the finished product!


(See? Not even close to a tutorial. Go here for the real thing.)
Making the button was so fun!
Two absolutely loved it. I think she could have made buttons all morning long!


Here's the reason I was even able to make something today...
Three next to me in a high chair, cheerios, and a sister willing to distract:


I chose to put a pin on the back:


But look, now it's in Two's hair!

How? I did something so cool!
I'll tell you in the next few days. :o)

We got tons of great compliments on it today.
Go make one (or two or ten) of your own!
(And send me a picture of it when you do!)


Friday, May 29, 2009

Randomness with tons of pics

Wow! So I didn't mean to take a two-week break from blogging!
I even kept crafting and taking pictures
so who knows what happened?!

Here is the big catch-up:

We went to story time about alligators
and my craftiness didn't quite extend to cutting in between every single tooth.
Two seemed happy enough with it.
Here she is roaring at the camera because what other sound does an alligater make?


We went for a walk in the park back behind our library:


But walking was not enough for Two, she preferred to fly:


I made Three his own set of keys, complete with key fob.
The finished product is somewhere in my mama van,
but as a consolation prize
here, at least, are my materials:

(Materials were about $2, then throw some old keys that you don't remember what they belong to or go to any place that makes keys and ask for a few from their "mistake" bin (free).)


As an only child who had a sibling for a short little while, watching my kids play together is always one of my greatest joys and something I make a point not to interrupt.
Here is One with his legs wrapped around Three
so Three wouldn't fall down
all while rockin' the baby toy air-guitar style!


I planted flowers.
Here is one that is still alive:


And some impatiens look adorable in these pots on my patio table:

(Do you see the roses in bloom in the background? Love them too!)


We got goofy at the mall:

(Then got issued a new credit card when the photobooth company got hacked into... Oops!)


One got his bobcat badge
and some really rockin' make-up:


I'm working on making a reusable snack bag:

The process is slow going because I am making a go of it without a pattern and, oh yeah, I like my sleep.
The fabric is a leftover scrap from this skirt.
Mental note: next time fork out the money for the pattern!


We went camping with friends over Memorial weekend.
DaddyMan made paper airplanes for the kids to throw into the campfire.
It was such a hit, I'm pretty sure it is our new tradition!

Breakfast


And most recently we've taken this guy back to the kidney doctor.

His bad kidney is still several times "normal" size. Another function test is back on the books. Hospital gowns, IV's, catheters, radio-active dye followed by radio-active diapers... We've got our fingers crossed and prayer chains full of prayers for good results because I'm pretty sure bad results will send him to surgery.


Up next are some grad gifts but those will need to stay top-secret for now since I know my favorite grad reads the blog.
(HI Kimiiiiiiii!)
Stay tuned!


Whew!
It's good to be back!